Tips for a Winning Resume In Sales, R&D, and Management
Today, there are currently an estimated 287,000 people employed by the medical device and pharmaceutical industries, according to figures by the United States Bureau of Labor and Statistics. Bill Lawhorn, a staff economist for the United States Department of Labor at the bureau, says these industries are expected to shrink slightly over the next decade, meaning an increase in competition for these jobs.
Whether you are breaking into pharmaceutical sales, desire a position as a research and development engineer, or you want to move up to management in medical devices, here are some tricks of the trade from experienced resume writers and experts who specialize in these industries. With these tips, you can freshen up your resume like a pro and beat out your competition!
Tips for the Sales Resume
1. Include Your Target Title
Always include the job title or position you want on your resume and bold it. Human resources persons typically scan resumes and this is one of the first things they look for. Include the specific title or position you are targeting such as Sales Representative, Field Representative, or Customer Service Representative rather than a general title. This is particularly important if you are new to the pharmaceutical or medical device industries.
2. Tailor Your Sales Resume
Just as each customer has different needs, so do potential employers. You will need to customize your resume for each and every position that you apply for. That isn’t to say you can’t have a general resume on file as a starting place. You will just need to read the job description of each sales role for which you apply and mold your resume to the specific needs of that position at that company to give yourself the best shot at getting an interview.
3. Nix the Objective
Remove “Objective” as a section title in your resume. The person who reads your resume will know that your objective is to get a job offer from them. This is an old resume style that you should avoid. Instead, start with your “Career Summary.”
4. Lead with Numbers
Melissa Orpen-Tuz, a certified professional resume writer for Great Resumes Fast, says those wanting to enter the medical device or pharmaceutical industries need a different kind of resume. For these industries, specifically in sales, she says you should include solid numbers that demonstrate your performance.
“This is truly different from any other career field,” says Orpen-Tuz. “On a sales resume you want to lead with numbers and quantifiable results to show what you have done.”
Include sales numbers, details of how you have grown the client pool for your current employer, or explain the more extreme lengths you have taken to make a sale such as taking medical training to better know your target industry. This is a place you can really set yourself apart from other candidates.
5. Feature Relevant Classes & Training
The medical device and pharmaceutical industries are very closed, meaning hires from outside the industry are uncommon, according to Debra Boggs, a professional resume writer for Great Resumes Fast. With that in mind, she advises any coursework or medical experience you can include in your resume will be beneficial.
“On your resume, do whatever you can to show your knowledge of the industry or in sales and marketing,” says Boggs. “If you have been a top performer in another industry, you are more likely to have success in the transition. Because they are so selective, they aren’t going to take someone from outside the industry unless they are a high performer. These are the hardest industries to get into.”
Highlight relevant courses you have taken to demonstrate your preparedness and ability for success in sales. This is especially true if you have attended seminars or industry-specific courses that apply to the position you want. Mention any classes that have specifically prepared you for pharmaceutical or medical device sales and how that education translates to an added value for your potential employer.
6. Boast About Your Relationships
In addition to quantifiable results and numbers, Orpen-Tuz says anyone seeking work in the medical device and pharmaceutical industries should also tell stories about how they have gone above and beyond to make a sale and develop long-term relationships with customers.
“It’s also really important to be able to build relationships with highly educated medical clients,” she says of these industries. “Be personable in your resume and show you want to build partnerships with doctors and others in the medical field.”
7. Tell Your Individual Career Story
Every resume is a narrative of a person’s career past and this is where you should flaunt what you have done to add value in your previous roles. Building this picture of you as a strong contributor makes you a better candidate for a sales role. This is where you’re going to highlight certain aspects of these [medical device and pharmaceutical] resumes you may not showcase in other industries, according to Orpen-Tuz.
“Show how you took the opportunity to contribute to a company on a national level, to build consistent sales strategies, and be able to shine as an individual contributor but also as a member of a team,” says Orpen-Tuz, who also emphasizes the importance of training. “Look for ways you contributed to team projects, training, experiences you have had to work across regions. I have done several sales resumes where they have done great in an individual contributor role which then led them to get invited to other high-visibility initiatives within an organization. Also, think about what is motivating you to enter this field so you can articulate that on your resume.”
8. Tout Your Applicable Skills
Sales is a very broad category. Any position where you have had to convince others or even just explain the features or qualities of a product counts as sales experience. Whether you had a retail job in the summer after graduation or have sold other products in the past, these are transferable sales skills.
In addition, where pharmaceutical and medical device sales are concerned, you also need to demonstrate analytical skills so you are able to easily share data and statistics with potential clients and existing customers. Being able to show that you are competent in identifying trends or sorting data is incredibly useful in pharma and medical device sales.
Science skills are also valuable when discussing the science behind the drugs or devices you are selling. Any experience you have had in a lab, working on science projects, or work involving any type of technical element can also give you a leg up.
9. Using Saleable Keywords
For sales resumes, you have to identify the correct key terms to use. I highly recommend focusing on industry-specific hard skills over generalized soft skills as they are more likely to be picked up by an applicant tracking system (ATS).
For example, if you are leaving accounting and are transitioning to pharmaceutical sales, you may wish to use keywords such as sales trends, market share, customer target plan, or deliverables. Research keywords for hard skills you will be employing in pharmaceutical or medical device sales. You can find abundant lists of keywords simply by googling key terms for a sales resume.
Under your position title, include industry-specific key terms that relate directly to your target position and specific skill set. Bold these key terms in italics. For pharmaceutical or medical device sales, you might want to include terms such as:
• Ownership Mentality
• Results-Driven
• Strong Presentation Skills
• Active Listener
• Customer-Focused
• Initiative
• Business Acumen
• Organizational Skills
10. It’s About the Bottom Line
Most employers, especially in medical device and pharmaceutical sales, want to know how hiring you would positively impact their bottom line. While you may not have facts, figures, and metrics that apply directly to the position for which you are applying, you can incorporate such numbers from your current position to demonstrate your value. The general assumption is that if you have been successful in the past, you can be successful in the future. To figure out numbers and facts to include in your resume, ask yourself the following questions:
• How much revenue did I generate this year?
• How did this year’s sales compare to last year’s or last quarter’s?
• Did I cut costs? By how much?
• Did I increase productivity? By how much?
• Did I impact client satisfaction?
• Did I increase efficiency?
• Did I save time? How much?
Consider ways you impacted the bottom line of your company and include that information in the bullet points under each employer on your resume.
11. How Do You Add Value?
Ask yourself the questions below to uncover the benefits you bring to the sales table. Mold the responses into your personal brand:
• What benefit or contribution do you add?
• What key sales accomplishments or successes have you delivered time and time again in your present or past roles?
• What would you say is distinct about yourself and how you do what you do?
• What are your greatest strengths?
12. Details Matter
Hiring managers love details. While your resume offers limited space, you still want to ensure there are details in it that recruiters and human resources personnel want to see. For example, you will want to include your ranking, quotas, call points, and the positions you have previously held. You will also want to include the types of products you have sold such as the names of particular drugs or medical devices. You will also want to mention clients you have worked with in the medical industry especially those with big names such as Johns Hopkins or the Mayo Clinic.
13. Share Your Website & Blog URLs
Be sure to share the URLs for your professional website or personal blog in your resume under your contact information. Websites and blogs are a wonderful means of sharing your work with potential employers. This is especially true if the work relates to the medical device or pharmaceutical industries such as tips for producing better sales numbers or crafting killer emails to garner attention for a product.
14. Keep It Short and Sweet
Orpen-Tuz says you can use as much space as needed to say what you need to say but resumes shouldn’t go beyond two pages long except with executives who may have resumes of up to three pages in length.
“Sales resumes give you the opportunity to be very succinct and less wordy,” she says. “The goal of the resume doesn’t have to describe the totality of what you have done. It’s to get you a face-to-face interview for a specific goal.”
With this in mind, your sales resume should be at least one full page in length.
15. Format and Style Count
When it comes to sales, you want a neatly formatted, clean, and easy-to-read resume. Your resume should be visually appealing. Stick with a basic font such as Arial or Times New Roman. This also ensures your resume works well with an applicant tracking system (ATS).
16. Tap Your Network
While many candidates start with applying through pharmaceutical or medical device company websites, this can be a slow process. A better strategy may be to reach out to people within the company through your existing network or through social media such as LinkedIn. By using your network to obtain the names of contacts where you can send your resume, it gives you an extra push to get your foot in the door that other candidates may not have.
Tips for the Management Resume
17. Lead with Leadership
Leadership skills are important in any management role across all fields but this is especially true in the medical device and pharmaceutical industries where competition for positions is fierce. This is particularly the case for someone transitioning from another industry. Focus your resume on skills that are highly valued in your target industry.
The article The Science of the Job Search, Part I: 13 Data-Backed Ways To Win by TalentWorks states that the use of the right leadership words can boost your resume by more than 51 percent over your competition. The article recommends using words such as:
• Communicated
• Coordinated
• Leadership
• Managed
• Organization
While hard skills take precedence, some soft skills can be added. Think in terms of your leadership ability, especially when seeking a management position, as well as team-building, problem-solving, and other invaluable soft skills. For each of the job experiences you include on your resume, tout your skills and professional accomplishments including numbers. Some soft skills, such as leadership, cross over industry and title. Use them to your advantage in your professional summary.
18. Plot by Numbers
As mentioned above, numbers are worth their weight in gold and are imperative to any management resume. Remember, your resume markets your brand, grabs attention, and demonstrates your abilities and results. It’s imperative you include measurable numbers and data if you want to be considered as a serious candidate for a management position.
For example, if you boosted sales 70 percent, added more than 200 clients, or improved productivity of your department by 1/3 in your last role, that information should be included in your resume. Numbers like these are attention-getters for recruiters who want to see the value you offer even if it’s in a different role or industry.
In the aforementioned piece by TalentWorks, resumes that demonstrate results with numbers were boosted more than 40 percent over competitor resumes that lacked such stats. To get the most bang for your buck, the blog recommends using at least one number every three sentences to demonstrate your positive impact and leadership ability.
19. Match Your Skills
Job candidates should always match their skill set in their resume to each specific job description. Employers know what they are looking for and use those key terms in the job description when they post it. Make sure that when you are adjusting your management resume to fit each position for which you are applying that you employ the words used in the job description. You can even use them more than once.
20. A Specific Career Summary
When applying for a management role, realize your career summary is a space of opportunity. This is where you can really set yourself up to shine which is important given you are looking for a management position in one of the most competitive career fields out there. While many people think of this area on their resume as a career overview, you should use it to set yourself apart from other candidates.
Include specific positions you have held and your most significant accolades. This part of your resume is a career snapshot where you should include prominent client names, major accomplishments, and bottom-line numbers, especially if you are seeking a position in sales management.
“Pharmaceuticals and the medical device industries are very numbers-driven, so any time you can show numbers such as new product launches, market share growth, or quota attainment, those are all really helpful, particularly for sales and marketing,” says Boggs.
You can also feature names of prominent Fortune 500 companies you have worked with. This grabs attention and demonstrates your ability to work with industry leaders, even if it’s in a different industry, as well as your potential to bring in big clients with your former connections.
21. Use Industry-Specific Buzzwords
Most employers now use ATS to sort resumes so using the right keywords is imperative to having your management resume seen by an actual person. Research and select three to five industry-specific key terms to use in your career summary that apply directly to the role of management. According to The Science of the Job Search, Part I: 13 Data-Backed Ways To Win, using industry jargon and buzzwords every three to six sentences can bump your resume over other applicants by more than 29 percent. Look at job postings for industry-specific management terms you can use.
Monster offers a list of key terms to use for management positions in its blog 15 Keywords You Need on Your Executive Resume. Ensure that the key terms you use apply to your individual skill set and the industry to which you are applying. Some of the key terms it recommends for those seeking an executive-level position include:
• Strategic Planning
• Performance Optimization
• Budgeting and Finance
• Crisis Management
• Multi-Site Operations
• Profitability Improvement
• Decision-Making
• Joint Ventures & Alliances
• Consensus Building & Teaming
• Best Practices & Benchmarking
22. Ask Others What They Think
Asking others what they think of you can help you identify and build a personal brand that is authentic. Ask friends and colleagues the questions below and use their responses to help you build a personal brand.
• How would they describe you?
• What do others see as the value you add?
• Read your LinkedIn recommendations and past performance evaluations and look for themes. When you put similar words and phrases together, what picture do you get?
• What do others say are your greatest strengths?
• How do others describe you?
• What do your boss, team, direct reports come to you for on a regular basis?
If you are introverted like I am, questioning others about yourself can create some anxiety. If you are someone who struggles with asking such questions, I highly recommend the Reach Personal Branding Survey. This tool allows you to gather the email addresses of those you wish to request feedback from and the program sends it out. All you have to do is watch the responses roll in. It’s anonymous so people can respond without worrying about your reaction and the survey does all of the work of searching for common themes in your personal brand.
23. Reveal Yourself
Think about the new management role you are targeting. What qualities does the perfect candidate demonstrate? What are their professional attributes? A CFO may be extremely analytical or focused on the bottom line. The best sales manager may challenge the status quo of how to sell a particular product. Think about your own experiences in the work force. In what situations did you display professional attributes and what were the results of your leadership?
By taking this time, you’ll see yourself from the view of a potential employer. These are the very things recruiters and human resource managers will consider when reviewing your management resume. Center your resume on your management career goals rather than simply adding a boring list of tasks others may perform.
24. Cash in on Past Experience
If you are applying for a management position, you obviously have some previous experience that you can capitalize on in your resume. Many employers will be delighted to have someone with demonstrated success in their previous work experience, especially if you can tell your story in a way that applies to the position you want. This is particularly true if you are changing industries. Consider how your past experience applies to the management role you want, focusing on sharing applicable highlights and numbers to set you apart. Any previous experience in biotech, pharmaceuticals, or medical devices will give you a leg up.
25. Show, Don’t Tell
Recruiters, human resources personnel, and hiring managers don’t want to hear about your soft skills. They want to see them in action through your accomplishments in your resume. Rather than writing in your resume that you are a “people person,” explain how your ability to work well with others won you a large contract or gained you additional clients for your current or previous employer.
26. ATS for Everyone
Managers, executives, and C-level applicants often assume that they don’t need to prepare their resume for an ATS. Everyone should have a resume to use with ATS as many companies use them for regulatory compliance with fair hiring practices. This means that despite the level of the position to which you are applying, an ATS scan might still be part of the process.
27. Addressing Abbreviations
When it comes to abbreviations in your resume, just spell them out on first reference. For example, you would spell out “Regional Sales Manager” on first use but could then abbreviate the term to RSM thereafter. This is important as some ATS won’t recognize such abbreviations.
28. Do Your Homework
Before you start working on updating and fine-tuning your resume to a specific position, make sure you have done your research on the company to which you are applying. If you are looking at a medical device or biotechnology company, you need to know about the products that company sells as well as the industry. By knowing what the company produces, sells, and who the target clientele is, you can adjust your resume accordingly and you’ll do much better in the interview.
29. Be Thorough and Succinct
Orpen-Tuz recommends being thorough in your management resume but not using more than two pages unless you are applying for an executive role. If you are applying to an executive management position, your resume may be up to three pages in length.
Do not include your entire work history. Only use the past 10-15 years of your work experience unless something further back is highly relevant to the position you want. A resume is not meant to be a complete summary of your life’s work. Orpen-Tuz says the goal is to get a face-to-face interview where you can go more in depth about who you are as a candidate.
Tips for the Research and Development Resume
30. All the Right Stuff
There are certain sections that should go into any solid resume and this is also the case for research and development. For the field of research and development, which is more scientific in nature, there are sections to include in your resume that may not appear in other industries or for other positions. Your resume should include the following sections and relevant information under each:
• Personal/Contact Information
• Professional/Career Summary
• Education
• Technical Skills/Key Skills
• Publications & Patents
• Leadership Experience
• Awards & Accolades
• Affiliations
• Licenses
31. The Career Summary
Your career summary will go just under your name and contact information on your resume. This is a concise paragraph that focuses on and emphasizes your key skills and accomplishments that are relevant to the position for which you are applying.
32. Key Skills to Kill It
Speaking of bullets, the article The Science of the Job Search, Part I: 13 Data-Backed Ways To Win by TalentWorks highly recommends adding a key skills section since you can’t drop enough industry buzzwords. The piece says adding this section of 15-20 skills using bullets can increase your hireability by more than 58 percent above your competition that fails to include this section in their resume.
Technical skills are incredibly important in research and development. Some key skills you may use in your research and development resume include:
• Ability to handle large datasets
• Perform high-level data analysis
• Analytical thinker
• Critical problem-solver
• Time management
• Independent worker
• Teamwork
• Technophile
• Multi-disciplined
• Understanding of legal and regulatory issues
33. Keywords for R&D
The most successful candidates for research and development, science-related positions, have a comprehensive resume. As someone in research and development, you must demonstrate superior written communication skills and part of that means identifying the right key terms for the title you are pursuing. Some key terms you may consider using, if they apply to you, include:
• Advancements
• Manufacturing
• Scientific Research
• Scalable Design
• Deliverables
• Project-Focused
• Consumer Goods
• Development
• Patented Devices
• Solutions
34. The 30-Second Rule
Professional resume writers often apply what is known as the 30-second rule. The rule states that you have—at most—30 seconds for your resume to grab the attention of the person reading it. That’s why the career summary needs to be compelling and the key skills bullets succinct yet applicable. These are the two sections hiring managers will skim to see if you have what they are looking for. If your resume passes the 30-second test, they will read the remainder of your resume.
35. Check out Online R&D Resumes
There are a ton of sample resumes available online to look at, especially for entry-level scientists in research and development. Review some of these sample resumes and use the portions most relevant to the position you want. Be sure to include the sections mentioned above in “All the Right Stuff,” and leave off “References Available Upon Request” as this is a waste of space. It is assumed by recruiters that you will be able to provide references upon request.
36. Connect Former Work and New Goals
You’ll want to identify aspects of your previous work that relate directly to research and development that you can share in your resume. Topics that translate well across virtually any industry include:
• Communicating with stakeholders to define business requirements
• Responding to business needs with new solutions
• Enhancing operational performance
• Cutting costs
• Improving customer experience and satisfaction
All of these items also relate well to research and development when it comes to meeting the needs of the business, developing new products, and keeping costs low. Think about how you have accomplished these goals in your current or previous roles so you can connect them in your research and development resume.
37. Bullets to Hit the Mark
Make a list of your top achievements in your current and past careers. Include successes such as leading a challenging team of individuals, expanding research, or increasing sales through the development of new products. Recall and enjoy the highlights of your career which have brought you accolades and recognition from others.
Include these in your research and development resume, ensuring you also add the impact your work had outside your company such as honorable mentions, distinctions, or awards given by professional industry organizations. Use bullet points to effectively sum up career highlights. Orpen-Tuz warns that bullets should be no longer than two lines of text and never three.
38. Share Your Achievements
In your R&D resume, share stories of success from some of the bulleted achievements above. Use the Challenge-Action-Result format to describe challenges you faced, the action you took, and most importantly, the results of your efforts.
These stories become the foundation of your scientific resume. These achievements should replace the classic list of tasks performed in prior positions as they provide hiring managers proof of your performance that can translate to your new position and distinguish you from other candidates. If a particular achievement is not applicable to the new role or industry you’re pursuing, leave it out.
39. Highlight Relevant Education
I always recommend listing your education at the top of the resume if a degree or certification is required for the position you want and it has been recently obtained or will soon be completed. This is especially true in research and development where many companies look for R&D scientists who have a degree in genetics, biology, biochemistry, chemistry, or a closely-related field.
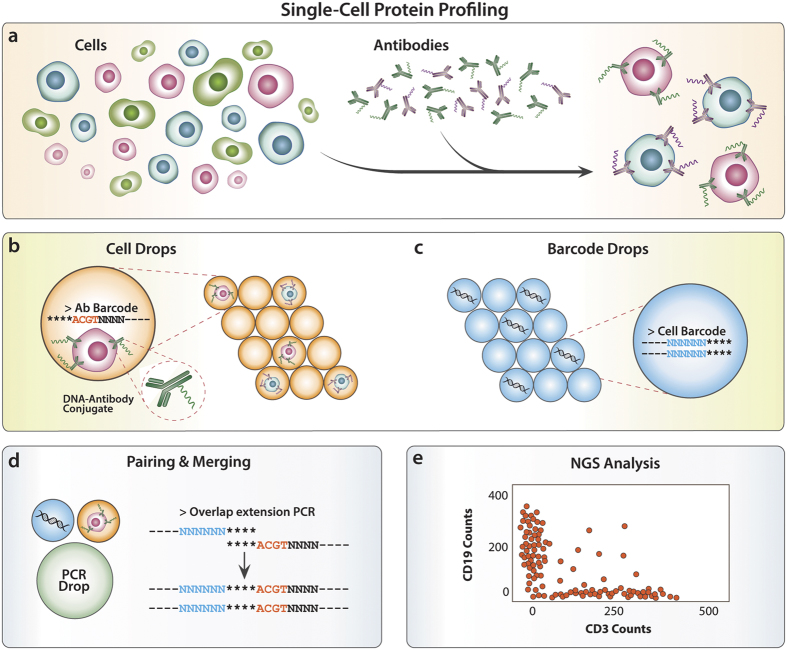
Recruiters also search for candidates who have a strong background in next-generation sequencing (NGS) methods, products, and applications in addition to excellent documentation and communication skills so they can effectively present data. Be sure to highlight your educational background so recruiters know you have the necessary training and knowledge for the role you want.
40. Branding with Quantifiable Metrics
Just as numbers are important for grabbing attention in sales and management resumes, they are also a distinguishing factor in research and development. Metrics, facts, and figures are essential to your resume.
When building your personal brand, facts and figures are paramount but can be tricky to identify in scientific terms. Think data loads you have analyzed, an increase in sales due to your product development, and the number of patents to your credit. If you are having trouble identifying metrics or numbers to use in your resume or branding, or even if you feel you have none, read Using Metrics in a Resume When You Have None for help.
41. Talk to People in R&D
Client Services Manager for Great Resumes Fast Chelsea Kerwin recommends talking to people who work in the medical device or pharmaceutical industries in research and development. By doing so, you will learn more about the role you want, the industry you are pursuing, and can identify potential companies to which you may want to apply. She says this is also particularly helpful when building your personal brand for your resume and online profiles. Such conversations may also help you identify keywords and mold a resume to get you where you want to go.
42. A Focused Format
While a great-looking resume won’t get you a job, an unappealing resume can knock you out of the running for an interview. Your resume should look nice and include bullets to make for easy reading where possible. Avoid fancy fonts, borders, or anything that might impede readability. Make sure your resume is sent in an easily read format such as Word. Those sent in a pdf format often cause import issues.
43. A Great Subject Line
When you do send your R&D resume, make the subject line of the email stand out. Find an interesting way to phrase it rather than just “My Resume.” For example, you might send a subject line that reads, “Top 5% Researcher Seeking Position in Chicago.” Using statistics and numbers is just one great way of catching a recruiter’s eye.
Tips for Every Pharmaceutical and Medical Device Resume
44. Your Name Matters Most
The name is the very first thing a recruiter scans on a resume, according to eye-tracking surveys. For better readability and to grab attention make sure your name is:
• In larger print than the rest of your resume
• In bold font
• At the top of your resume and cover letter either left-justified or centered
Some ATS have difficulties “reading” post-nominal titles or abbreviations attached to names such as Ph.D, RSM, and CFO. Leave these qualifications off of your name. To avoid having your resume dismissed by the ATS, simply include them in your career summary or education section.
45. Keys to a Professional Email Address
You may need to create an entirely new email address if your current professional email includes a former title or business name for a different industry. The creation of a professional email address should include your initials and a combination of numbers, or your first name and last name with the addition of numbers if necessary to distinguish your address from the other “John Smiths” out there. Keep it simple.
46. Use Your Address
Recruiters will sometimes check proximity of an applicant when running a search so include your address. If you leave your address off, your resume may not register in an employer database when they search for candidates by location. Zip codes are especially important when it comes to applicant tracking systems (ATS). If you have concerns about privacy, just use your city, state, and zip code on your resume so it can still be found by recruiters using an ATS.
47. Use Your LinkedIn Profile
When it comes to personal branding, Kerwin advises marketing yourself fluidly between your resume and LinkedIn profile. Whether a recruiter or hiring manager is looking at your resume or your online profile, it’s important to deliver a consistent message of who you are professionally and where you want to be.
“Make sure your resume and LinkedIn profile are positioning you for the industry and jobs you want to target now,” says Kerwin.
The fact is recruiters are more likely to connect with candidates who have common connections and LinkedIn automatically shows visitors who you are both linked to. This is a terrific way to get your foot in the door with a medical device or pharmaceutical company, especially if you are venturing into one of these industries for the first time. You can get even more resume tips for changing career fields in the blog 101 Resume Writing Tips for Career Change Resumes.
48. Your Branding Statement
Your branding statement goes at the top of your resume just beneath your contact details where the old objective statement used to be. This statement should be hyper-focused on the position you want, set you apart from other candidates, address the value you offer potential employers, and speak to problems you can solve for them. For example, I always tell people my heart’s desire is to use my 12+ years of HR experience to help job seekers create interview-winning resumes for those who don’t have the time, experience, or expertise.
If you are making a switch into the medical device or pharmaceutical industries, Boggs recommends adding a little narrative in this spot on your resume. The narrative should explain why you are making the transition and what you bring to the position.
For those already in the industry, Boggs says to mention your area of specialty (neurology, biologics, etc.) and any specific information you can give about drugs or technologies you have worked with. She says this is helpful because it makes you attractive to other companies as you already have that background.
49. Ask, “Why Do I..?”
When it comes to personal branding, one of the questions to ask yourself is “Why do I…?” Why do you want to be in a particular industry or position? Why do you do the work you do? If you are having trouble answering this question, or some of the others, I highly recommend Start with Why. This link can help you figure out the why behind what you do. Many people know what they do and how they do it, but not the why. Knowing the why is imperative to formulating a personal brand that will help you achieve your career goals.
50. Job Post Pointers & Making Career Connections
Kerwin recommends looking at sample job posts to learn which qualifications are required for the industry and position you want. She says by looking at job posts for the industry and career you are targeting, you can determine which required skills and experience you have to offer. Incorporate these into your resume and LinkedIn profile in a way that is relevant to the position you are seeking.
Whether you are in a career transition or are just starting out, Orpen-Tuz suggests those seeking a career in the medical device or pharma industries read position descriptions carefully to see where they can draw connections from their prior work experience.
“Researching specific companies and their approach to medical devices and pharma [is a good place to start],” according to Orpen-Tuz. “You may not have the necessary specific requirements but you can see the job connections between what you have done and how that can connect.”
51. Keywords to Capture Attention
Boggs also recommends paying special attention to the keywords in the job description for which you are applying. Keywords that are in the requirements for the job need to be in your resume. Make sure you are tailoring your resume to the job for which you are applying.
To be effective, keywords should be used throughout your resume. In the various sections of your resume from the career summary to your individual work experience, sprinkle in key terms and use the most important ones more than once. As you adjust your resume to each job post, you can easily add in extra keywords to the Key Competencies/Areas of Expertise section which is essentially just a list of keywords anyway.
If you are struggling to develop a branding statement, simply select three keywords related to your personal brand. A thesaurus is a great resource for this as is the Google Keyword Planner. After you have selected your three words, center them across the top of your resume beneath your contact information. I also advise first researching industry-specific key terms to use. Job postings are a great place to start this research.
52. Optimize Your Resume for ATS
The number one thing Boggs recommends when it comes to resumes for the medical device and pharmaceutical industries is to ensure your resume is ATS-optimized. She says nearly every job seeker in these industries will encounter an ATS so your resume needs to be up to snuff.
53. Avoid Double-Duty Resumes
Orpen-Tuz says if you are looking at pharmaceutical or medical devices as a new field, don’t try to use an old resume that does double duty. Be very focused on breaking into the medical devices and pharma idustries with an updated resume specific to the field you wish to enter.
54. Shun Personal Pronouns
When it comes to your resume, words such as “I,” “my,” or “me” should be removed. Recruiters are always pressed for time so they find options to systematically sort resumes and this is one way they do it. A tiny error such as using first-person pronouns can land your resume in the garbage. As a matter of fact, the use of personal pronouns can drop your chances of getting a call back for an interview by more than 54 percent, according to the online article The Science of the Job Search, Part I: 13 Data-Backed Ways To Win by TalentWorks.
55. Make Your Action Verbs Work
Start sentences with action verbs to pump up your resume. Action words demonstrate actively what you have done and how you added value to your past employers and/or industry. The List of 100 Action Verbs is a convenient and helpful reference for incorporating action into your resume. This is especially important when competing in industries where there are more candidates vying for fewer positions such as in the medical device and pharma fields. Utilizing the right verbs demonstrates your personal brand, energy, and value.
56. Avoid Unnecessary Adjectives
“I recommend that you are really, really cautious about using adjectives,” says Orpen-Tuz. “Rather than using adjectives like ‘I am a go-getter, dynamic, etc.,’ use those words that tell a story about a time that exemplified those characteristics.”
Write something more specific using one adjective that describes you but not every other candidate. For example, you might write, “Lead a departmental team of 10 who increased sales 20 percent under my supervision.” A thesaurus is a good resource for finding adjectives beyond the ordinary.
57. Pass on Overused Phrases
In every industry, certain phrases have become tired because recruiters have seen them time and again. These include “team player” and “excellent communicator.” Avoid these overused phrases at all costs. Using the term “team player” reduces your hireability by 51 percent, according to the online piece The Science of the Job Search, Part I: 13 Data-Backed Ways To Win.
Other words I recommend avoiding on a resume that fail to add value include “detail-oriented,” “responsible for,” “successful,” and “results.” Eliminate overused words and phrases in your resume such as “accomplished professional,” “demonstrated excellence,” or “proven ability.” Find other phrases to avoid at 10 Overused Resume Phrases Damaging Your Job Search. This short blog also provides options for replacing such tired old terms.
58. Talk to People in the Industry
Boggs suggests reaching out to professionals who have the job you would like to arrange informational interviews where you can ask for advice. This will also help with introductions to others in the industry you are pursuing before you even start working on your resume.
59. Experience Outside of Work
Kerwin says the experience you share on your resume doesn’t have to be all work-related. Consider including accomplishments outside the workplace such as volunteer work and opportunities you’ve taken outside of your company. When it comes to your job search and resume, all relevant experience counts. Whether it is volunteer, academic, or older experience, include it if it is relatable to the job you want.
60. Gauge Your Graphics
While graphics can add to the appearance of your resume, Orpen-Tuz warns against using too many graphics. She says it is important that graphics support what is in the text.
“I always stress with people that we want something that is clean and easy to read,” she says. “Sometimes flashy is ok but we don’t want formatting flairs to eclipse the content. I personally tend to use those (graphics) with higher-level resumes.”
61. Contemplate Company Culture
Research and consider company culture when crafting your resume. You can research each company on their website and on sites such as Glassdoor as well as on social media including Facebook and LinkedIn.
Once you learn about a company’s culture, adjust your resume accordingly. For example, if the company you wish to work for expects employees to give back to the community, you’ll want to include your volunteer efforts both inside and outside the workplace on your resume. You want a resume that fits with the company for a better shot at getting called for an interview.
62. Downplay Irrelevant Education
If the degree or education you have isn’t required or directly related to the position, put it at the end of your resume. Another reason for placing this information at the end of your resume is if you want to share with the employer that you have some education, but didn’t complete your education. This is not something you want to draw attention to. If you are not planning on finishing your degree or certification, check out the article What Should You Put on Your Resume When You Didn’t Finish your Degree?
63. Formatting Formulas
You may choose to use a chronological or hybrid format for your resume. A chronological resume simply lays out your career history in order starting with your most recent or current position and moving backwards over the last 10 to 15 years.
While the chronological resume is the most common, a hybrid can downplay job-hopping in your resume. This is ideal for those who have switched positions every year for the past several years or for those who have significant employment gaps. Keep the focus on relevant achievements and push the chronology to the end of the resume. While a hybrid format is similar to a standard resume, the section for relevant experience comes after the career summary. You’ll need to be strategic about employment dates and keep your current position brief. Read more about these strategies in 4 Tips to Downplay the Appearance of Job Hopping on Your Resume.
For more resume writing tips on using fonts, design, and formatting, and more, read 131 Resume Writing Tips – The Most Comprehensive List of Resume Writing Tips on the Internet.
64. Review Your Resume
As always, I highly recommend running a spell check and grammar check of your resume. When this is done, give your resume a final read. You want to catch any potentially embarrassing grammar and spelling errors that could take you off the interview list.

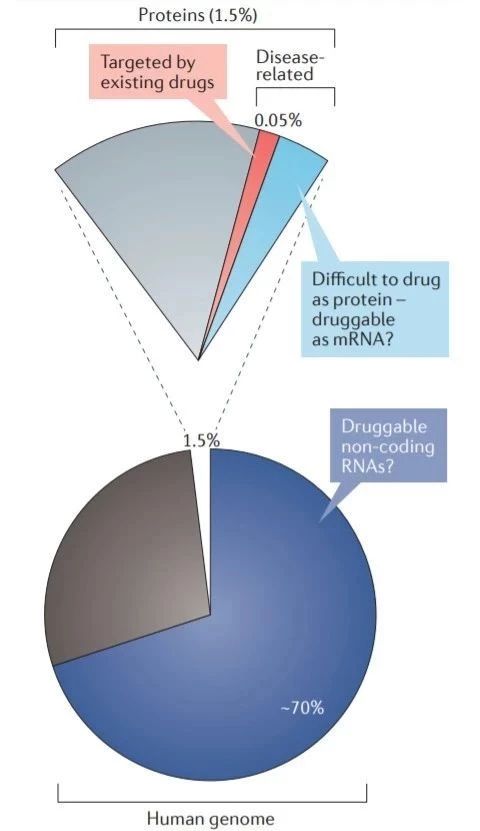


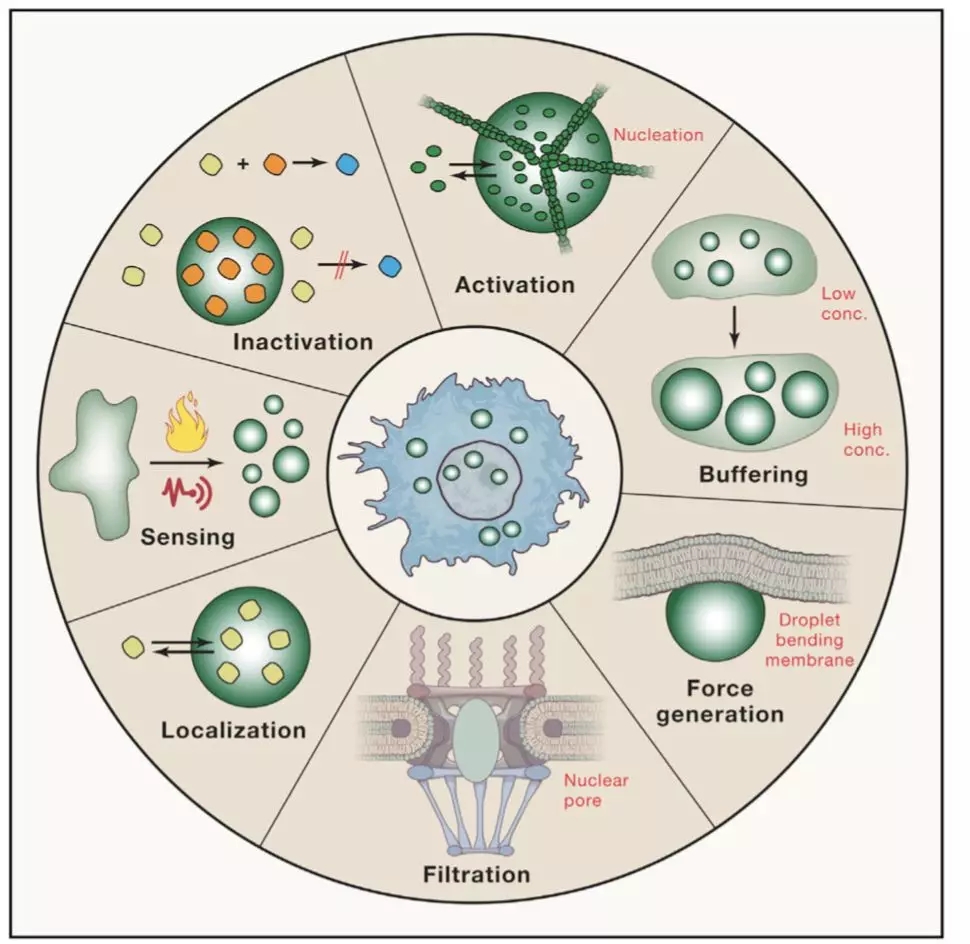
 图6 TDP-43的LCD能够在Optodroplet系统中蓝光诱导产生可逆的相分离的现象。


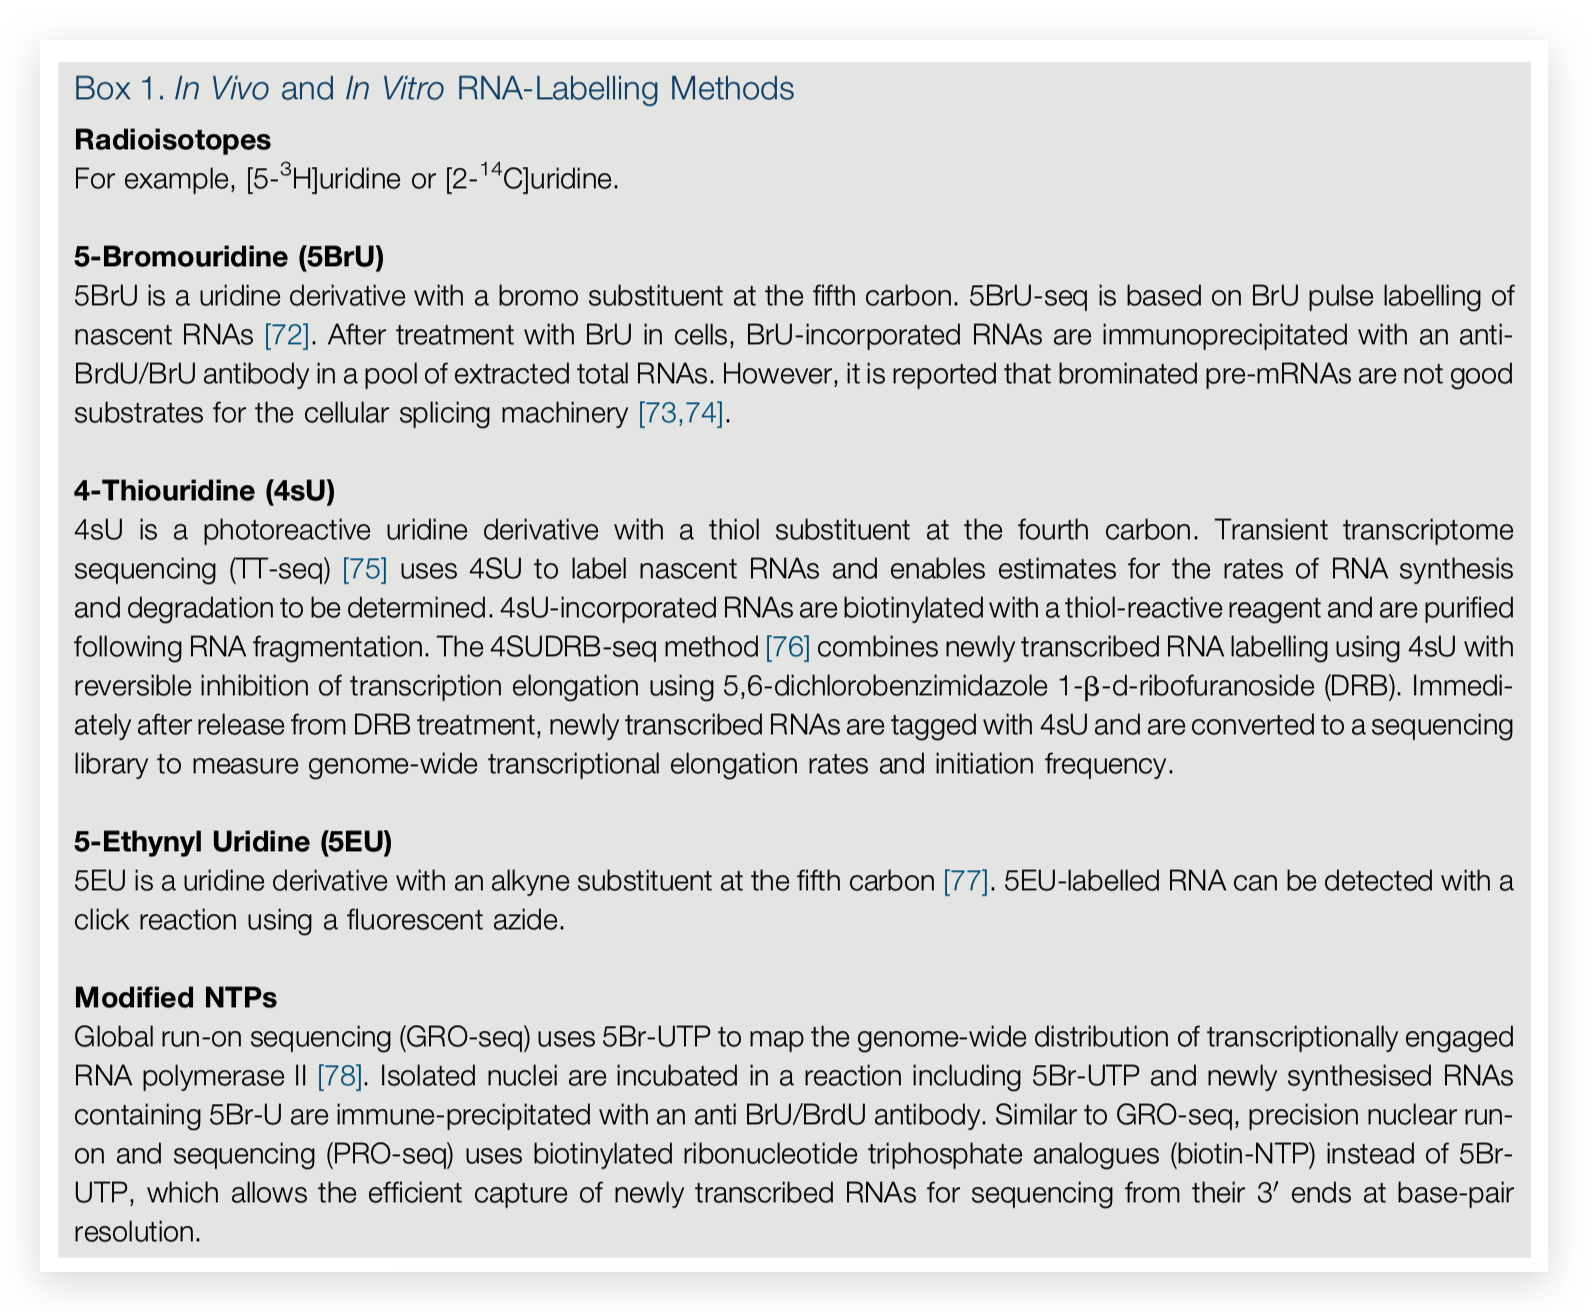
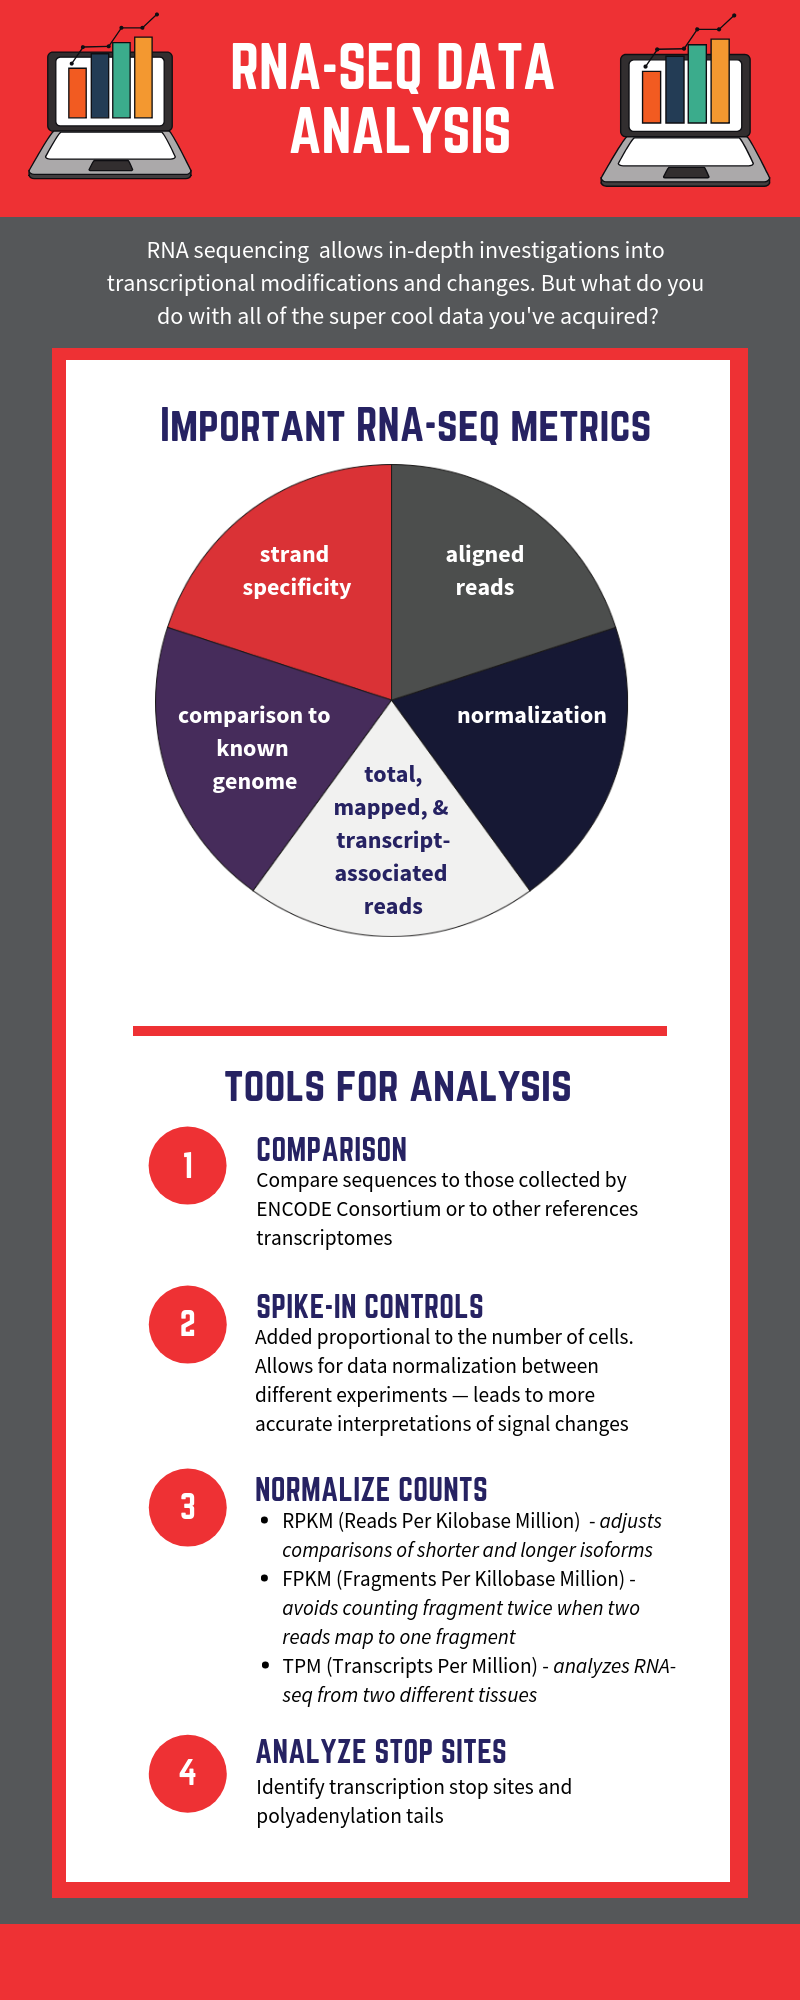 RNA-seq is based on next-generation sequencing (NGS) and allows for discovery, quantitation and profiling of RNA. The
 Researchers from the University of Cambridge have developed a new method to capture protein-RNA complexes which is compatible with downstream proteomics or RNA-Seq.